Tuesday, November 30, 2010

Homemade Bread

When it turns cold out, I like to use the oven. I tend to make a lot of soups during the winter and nothing accompanies soup better than warm bread. I have never made homemade bread before, but I found this recipe online for a bread that uses rice or soy milk rather than cow's milk, which makes this bread vegan. The reviews for this recipe were good, it seems relatively easy and honestly, there is nothing like bread right out of the oven...

Whole Wheat Bread Recipe (vegan)
The bread comes out crispy on the outside and soft, slightly sweet, and both fluffy & firm on the inside. Yum.
Ingredients (Yields one loaf)2.5 teaspoons yeast1 tsp sugar1.25 tsp salt1 cup warmish water (not burning hot, but warm)1/4 cup honey, molasses, or maple syrup1/4 cup oil (I use olive, but probably other veggie oil will work)1/4 soy or rice milk3.5 cups flour (whole wheat and regular white mixed) --I recommend 2.5 cups whole and 1 cup white
Directions1. Mix first four ingredients in a big bowl. The yeast will start to come alive (bubble and get all excited and stinky).2. Let that sit for a few minutes (or 10).3. Dump the remaining ingredients into the yeast mixture.4. Stir with a wooden spoon until it gets all weird and tacky.5. Then roll up your sleeves and start working it with your hands.6. Time for Bread Knead #1. Dump the dough out on an oiled clean counter. Knead the dough for 7 minutes or until it is smooth and supple like a butt.7. Time for Rising Session #1. Dump the dough into an oiled bowl. Cover with a cloth and put into a "slightly" warmed oven for 1 hour or until dough is fluffed.8. Time for Bread Knead #2. Put the dough back on the counter. Only Knead it once or twice. Then shape the dough into the size of your bread pan. And plop it into the oiled pan.9. Time for Rising Session #2. Put the bread pan (with dough) back into the warmish oven. Let it rise for another 30 mins. to 1 hour (or until it dough rises above the edges of the pan).
10. Preheat oven to 350 degrees (make sure bread isn't in the oven yet!).11. Bake for 40- to 1 hour (or until bread is lightly browned). "Experts" say if you hit the back of the bread and it sounds hollow, it's ready. BUT THE BREAD IS TOO HOT!! DO NOT ATTEMPT! No way you can test the bread by slapping it on the back. You just have to "know" when it is done.12. Let it cool! I know it smells good and bready...but it'll be weird and crumbly unless you let it cool for about a half hour. To slice: always turn the bread on its side and then go at it with a serrated knife.It may take a time or two until you get the dough just right, i.e., not undercooked. ENJOY!

Wednesday, November 10, 2010

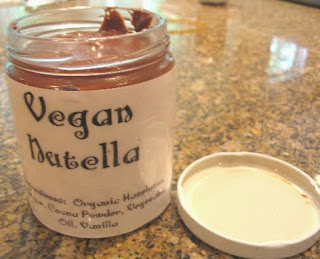
Vegan Nutella (Not-tella)

Nutella has dairy in it? Why? Its just a hazelnut spread with chocolate... Sometimes I have a hard time understanding why whey is added to things when it would be perfectly fine without it.
If you are a chocolate peanut butter lover and you don't eat dairy (or want to be healthier) have I got good news for you! I have found a blog which contains a dairy free recipe for Nutella...or as they call it "Not-tella". Sometimes its better to rely on yourself in making goodies - that way you know exactly whats in it! Enjoy!

Monday, August 16, 2010

Ingesting Aloe Vera for Internal Healing

We've all heard about the healing benefits of aloe vera. We grew up rubbing it on cuts or sun burns, but research these days is showing that it can help with miraculous healing internally as well, if ingested. It is anti-inflammatory, anti-bacterial, anti-viral and helps with digestive ailments and disorders, heartburn, ulcers, acne, asthma, and its a general tonic for the immune system. It also apparently helps you take in more nutrients and minerals from the foods you eat. Why would I NOT want to give this a try???
So, I bought an aloe vera leaf today and had no idea what to do with it. After looking it up online, I learned that you are NOT suppose to eat the actual leaf, just the "gel" that you find inside the leaf after slicing it open from the side. Take a knife or spoon and scrape down the leaf until you get all the gel off. Cut it into squares and put it in a left over container to use as needed.
I used about 1/4 cup of it in my smoothie today. I also read that in other cultures, they often juice it or use small cubes of it in salads. Don't expect any flavor...it tastes like nothing...that is why adding it to a smoothie or juice works well. It just blends into the flavors of the other ingredients.


Thursday, August 12, 2010

Recipe: Portobello Burger

I found this mouth-watering recipe through Vegnews Magazine today. I think vegetarians and meat-lovers alike will enjoy this one. I definitely know what I'll be grilling the next time I'm at a bbq...

What You Need:
4 sun-dried tomatoes
3 tablespoons hot water
2/3 cup freshly chopped basil, divided
2 tablespoons minced garlic, and divided
3/4 cup vegan mayonnaise
3 tablespoons olive oil
2 tablespoons balsamic vinegar
2 tablespoons tamari or soy sauce
6 portobello mushrooms, de-stemmed
6 hamburger buns or rolls
Choice of toppings such as lettuce, tomatoes, onions, avocado, vegan cheese, etc.

What You Do:
1. Preheat the grill. Place the sun-dried tomatoes in a small bowl, pour the hot water over them, and set aside for 15 minutes to rehydrate. In a food processor, place the sun-dried tomato mixture, 1/2 cup chopped basil, 1 tablespoon garlic, and the mayonnaise, and process for 1 minute. Transfer mixture to a small bowl and set aside.

2. In a small bowl, whisk together the remaining chopped basil and garlic, olive oil, vinegar, and tamari, and set aside. Dip each of the mushrooms in the marinade and place on the hot grill, stem-side down. Grill the mushrooms for 5 minutes, carefully flip them over, and grill an additional 4 to 5 minutes or until tender.

3. Slice the buns and lightly toast on the grill. Serve the grilled mushrooms on buns with your choice of toppings and a few spoonfuls of the flavored mayonnaise or other condiments of choice.


Tuesday, August 3, 2010

Homemade Spring Rolls

Some days it is just way too hot out to turn on the stove or oven. During those times, a perfect dinner option is homemade spring rolls! Don't feel like asian? That's okay, spring rolls don't HAVE to be like the traditional ones you order at your favorite chinese/thai restaurant. Get creative! Tonight my spring rolls are made with canned salmon, avocado slices, cucumber and roasted red pepper and I'm dipping them in balsamic vinegarette. Last night my spring rolls had turkey strips and romaine lettuce in one and chicken meatballs slathered in bbq sauce in the other. Dip them in anything - salad dressing, marinade, spaghetti sauce, mayo, whatever you like.
Up until now, I hadn't made spring rolls because I was intimidated by using the spring roll wrappers but they couldn't be easier to work with. I found them at a local asian grocery store (in St. Paul I went to Star Dragon Grocery off of Dale). To use spring rolls, you just dip them in warm water for a couple of seconds and then lay them flat on a working surface. Put your fillings in on the lower half of the wrapper as though you were making a burrito and then roll it up, tucking both sides in before you finish the roll. I'd love to hear what sorts of combinations you try!

Wednesday, June 9, 2010

Recipe: Quinoa-stuffed Avocados

Since I am on my avocado kick, here is another recipe I found from VegNews...Quinoa-stuffed avocados. Not only is this going to be delicious, its going to be very healthy for you too. Remember, avocados may be fatty, but its the GOOD fat!

What You Need:
1-1/2 cups cooked quinoa
1 ripe tomato, chopped
2 scallions, minced
1 tablespoon minced parsley
Salt and black pepper to taste
2 ripe avocados
1 tablespoon fresh lemon juice
1 tablespoon olive oil
4 large butter lettuce leaves

What You Do:
1. In a mixing bowl, combine the quinoa, tomato, scallions, parsley, salt, and pepper. Mix until well combined.2. Carefully halve avocados lengthwise and remove the pit. Running a small knife between the avocado skin and flesh, remove pulp, keeping shells intact. Cut the avocado pulp into 1/2-inch dice and add to quinoa mixture.3. Add the lemon juice and olive oil and toss gently to combine. Taste to adjust seasoning.4. Spoon the mixture into reserved avocado shells and serve immediately on salad plates lined with lettuce leaves.

Thursday, June 3, 2010

Recipe: Summer Quesadillas

When the weather is warm and summery, I crave to eat light and fresh foods that incorporate summery ingredients like mangoes and avocadoes. Here is a recipe I found off of "mambo sprouts" that is sure to satisfy your summer food craving: Avocado & crab quesadillas with mango salsa. You can adjust the recipe to your taste. I personally would leave out the cheese as I can't digest it and don't care for cheese alteratives. You could always substitute with things like hummus...or just extra mashed avocado. Also, you can try including some mango chunks into the quesadilla itself.

Salsa:
1/2 organic mango seeded and diced
1 roma tomato, seeded and diced
Juice of 1 organic lime, freshly squeezed
1/2 Tbsp. mint
3 Tbsp. raspberry vinegar

Quesadilla:
1 cup crab, cooked and shredded
3 oz. monterey jack cheese, shredded or soy cheese alternative
1 organic avocado, diced
1/4 cup scallions, chopped
1/4 cup organic bell pepper, roasted and chopped
3 Tbsp. roasted sweet corn
1 Tbsp. lime juice
6 flour tortillas
Salt and pepper to taste

Directions:
Salsa:
In a bowl, combine all ingredients and toss gently.
Cover and chill at least 1 hour.
Quesadillas:
Preheat oven to 350ยบ F.
Combine all ingredients except tortillas and toss gently. Season.
Place three tortillas on baking sheet and divide mixture over tortillas, spreading evenly.
Top with tortillas and bake until the cheese is just melted.
Cut into triangles and serve with mango salsa.
Servings: 6

Nutritional information per serving: Calories 330, Fat 110 , Total Fat 13g , Saturated Fat 4.5g , Cholesterol 45mg , Sodium 670mg , Total Carbohydrates 37g , Fiber 5 g, Sugars 5g , Protein 18g, Vitamin C 30%, Vitamin A 8%, Calcium 20%, Iron 10%.
Nutritional data in these recipes is approximate. It is provided by manufactures or through analysis with industry software that uses USDA data. Persons on special diets requiring more specific nutrient data should consult a physician or registered dietitian.

Thursday, March 18, 2010

Homemade Yogurt

I have recently been reading about all the benefits an individual with lactose intolerance can reap if they ingest yogurt with live cultures (yes, this even means yogurt made of REAL milk). The way it goes is that the live cultures apparently take care of the digestion of whey which your stomach would normally have to do...therefore, it leaves your digestive system alone and you are free of those horrible symptoms. Of course the more live cultures there, the better you are. Fresher = stronger cultures.

Whenever I visit India, I am always offered yogurt after my meal. This yogurt was usually made the exact same day which means that those cultures are really quite live and active!! Indians very often use this homemade yogurt as a way of helping digestion and I can say personally that my stomach always feel good after ingesting it. So then I asked myself, would I be willing to go through the process of making my own homemade yogurt? I decided that it depended on just how lengthy and fussy it was....so I tried it today for the first time.
Here is what you do for 1 serving:
1. Heat 1 cup of milk on the stove and have a candy thermometer handy. When the milk temp rises to 180 degrees, pull it off the burner and pour it into the container that you would like the yogurt to be stored in.
2. Keep the thermometer in the milk and wait until it cools to 110 degrees. When that temp arrives (but no sooner), stir in just 1 teaspoon of a store bought yogurt that contains live, active cultures. If you put it in before it cools to 110, it will kill the live cultures.
3. Now here is the catch...for between 5 and 8 hours, this mixture of milk and yogurt needs to remain at around 110 degrees and you can do this many ways. I found that the first setting on my heating pad was about 110 degrees, so I put the bowl on top of the heating back and covered it with a lid. You can also get a yogurt maker which automatically knows to keep it at 110 degrees. I've heard other people keep it in their oven at 110 degrees. Some people just put it in a pan that has hot water.
I found the heating pad to be a really simple way to do it. I set this up in just a couple of minutes flat and then left for work. When I arrived home 7 hours later, I did not find a cup of milk but solidified yogurt!! It worked - and it was really not that hard or tedious. All said and done, my work took about 10 minutes with the waiting for specific temps and to me that is worth the benefits of healthy, homemade yogurt.
I like that I am controlling the ingredients and the amount of sugar it contains. I tried a little and it was light, creamy and actually quite tasty for plain yogurt. Tonight when I eat it, I will stir in a little honey or a spoonful of fruit preserves.


Monday, March 8, 2010

Guacamole sandwiches!


Do you like guacamole? Most people I know LOVE it. Its healthy for you (if you don't overdo it, that is!), its filling and its soooooo tasty! So, why not venture out of the chips and dip world and try it between two slices of bread? That's right, a guacamole sandwich!
My sandwich tonight will include avocado, slices of tomato, slices of cucumber, some lettuce, a tiny bit of mayo and two pieces of toasted sunflower bread (with a side of potato soup). Before I add the avocado, I plan to mash it up with some lemon juice and salt and pepper.
Everyone has their favorite ways of enjoying "guac"...so make the sandwich to your taste. Add garlic, onion, what about italian dressing?? Mayonnaise? If you're a vegetarian and want it more filling, add beans or mock meat or a fried egg. If you're a carnivore, add turkey breast or crab meat... The options are endless!

Wednesday, January 27, 2010

The Top 10 Most Healthful Foods That You AREN'T Eating

Recently, Men's Health magazine put out an article that featured the top 10 foods available at our markets that you probably haven't incorporated in your diet. I think it is always good to be reminded what foods are the most healthful and why. I thought I would share the link to this article. Here are the first 5 items. The last 5 items to come later...

http://simplegoodandtasty.com/2010/01/14/the-10-best-foods-you-arent-eating-but-should-1-5?utm_source=SGT+Newsletter&utm_campaign=724138e6cf-What_s_Simple_Good_and_Tasty_This_Week_11_10_2009&utm_medium=email

Sunday, January 24, 2010

Why do they put sulphur dioxide in dried fruits?


We're getting ready to go on a trip...and whenever I travel abroad, I always make sure that I have plenty of dairy-free snacks in my carry on to get me through the trip. One staple I usually take is a trail mix that includes nuts and dried fruits. Today as I was grocery shopping for my trail mix, I noticed on the shelves that there was the option to get dried fruits that contained sulphur or not. I have always noticed that sulphur was added to dried fruits but was never really sure why.

When I got home, I did my research and I'm glad I did! I will not be buying sulphured dried fruits ever again. According to several sources online, including Organic Guide, sulphur is added to dried fruits to preserve the bright colors. Many sources mentioned that when dried fruit is kept sulphur-free, it often becomes dull in color, though it often retains the flavor of the fruit BETTER than the fruit that has been sulphured... Now why on earth would I choose to injest a preservative just so that my dried fruit can maintain its bright red or orange color?? And if the unsulphured fruit has a better flavor, I think the answer is a no brainer.

Also an important thing to note - sulphur dioxide can be very harmful to individuals (especially children) who have asthma and food sensitivities in general. The organic, natural way of eating is the way to go once again...and that means avoiding foods that have been sulphurized.

To read more on this, check out the Organic Guide at: http://74.125.95.132/search?q=cache:WDHqZnJc1CEJ:www.organicguide.com/blog/just-food/organic-dried-fruit/+why+sulphur+fruits&cd=4&hl=en&ct=clnk&gl=us

Wednesday, January 20, 2010

Turkey sausage and mixed greens soup

After I started my research on adding calcium to my diet, I made a trip to Trader Joes where I bought a bag of Southern Greens Blend. It has a mixture of collard, turnip and mustard greens, along with spinach. With 1.5 cups of this stuff, you get 8% of your calcium daily needs. Tonight for dinner, I am making a very healthy, yet deliciously satisfying soup.

Turkey Sausage and Mixed Greens Soup
1 serving

1 Turkey sausage cut up into chunks

1/2 cup diced potato

1/4 cup frozen corn

1.5 cups of Southern Greens Blend

1 cup chicken broth

1/4 cup already baked butternut squash

dash paprika

dash balsamic vinegar

dash cinnamon

pinch of brown sugar


* Mix all of the ingredients together and slow cook for an hour.

Friday, January 15, 2010

January: National Oatmeal Month!


Did you know that January is National Oatmeal Month?!


Hahaha...well apparently its true... Since oatmeal is apparently in the spotlight, I thought that I would post a link to this blog that I came across. It outlines the nutritional differences between steel-cut oats, stone ground oats and rolled oats. I mean, if you're already going to oatmeal for its nutrition, you may as well know which is the best route to take, right?


Also, we all know that oatmeal has a great amount of fiber and truly helps people lower their cholesterol. Add a few raisins or slices of banana, sprinkle some sunflower seeds or walnuts, pour some vanilla soymilk and you've got a meal that is not only extremely nutritious, but will stave off hunger for hours.


Happy reading!


Thursday, January 14, 2010

Are you getting your 1000 mg??

So apparently as a 30 year old woman, I am suppose to be getting 1000 mg of calcium every day. As you may know, I am a pretty healthy eater. I definitely get my 5-9 fruits/vegetebles per day but I most definitely do NOT get 1000 mg of calcium. So you think, okay then, just drink a glass of soy milk. Unfortunately I do and it doesn't do it alone. One cup only gives you 30% of your daily needs...and 3+ cups per day does not sound that appetizing. Unlike regular ice cream which provides 10% in a 1/2 cup, soy ice cream (at least the Soy Creamy I get from Trader Joes) has no calcium added. Oops...I guess not all soy products are fortified! I even make sure to add a cup of spinach to my daily vegetable soup, but you need 3 cups of it to get to 8% of your daily needs.

So, what I have learned is that I must look beyond my cereal bowl and my spinach soup to get the 1000 mg that I am suppose to get on a daily basis. What other products are high in calcium? Here is a brainstorming list for you with the % it meets for your daily needs.


1 cup of Broccoli = 3%

3 oz Mori-Nu Silken Tofu = 3%

1 cup Kidney Beans = 6%

1 oz Almonds = 6%

1 cup of an Orange = 7%

1 cup cabbage = 8%

1 packet instant fortified oatmeal = 10%

Chocolate ZenSoy Pudding =15%

Trader Joes Soy Yogurt = 30%

1 cup Vanilla Soy milk = 30%

Don't forget, spices can include calcium as well!

1 Tbsp Cumin = 6%

1 Tbsp Cloves = 4%

1 Tbsp Oregano = 9%